Menindaklanjuti artikel sebelumnya, PKL (Pertolongan Komputer Lelet), berikut ini adalah penyebab komputer lelet adalah sebagai berikut.
Read more
Showing posts with label Windows. Show all posts
Showing posts with label Windows. Show all posts
Thursday, November 12, 2009
Monday, September 7, 2009
PKL (Pertolongan Komputer Lelet)
Komputerku sekarang kok terasa lelet ya? Nggak kayak waktu baru beli dulu ...? Mungkin Anda salah satu yang merasakannya. Solusinya?
Biasanya, solusi pertama yang terpikir adalah upgrade. Buat yang berkantong tebal, mungkin tanpa pikir panjang langsung mengambil langkah tersebut. Tapi buat yang berkantong tipis sepertiku... mungkin cuma bisa garuk-garuk kepala pusing harus gimana.
Sebenarnya, belum tentu langkah mengupgrade hardware komputer menjadi solusi yang paling tepat. Ibarat rak buku, jika terlihat sesak karena berantakan apakah membeli rak buku yang lebih besar atau menambah rak buku menjadi solusi yang paling tepat? Benar, membereskan dan merapikan buku-buku dalam rak tersebut, serta memilah dan membuang buku-buku yang sudah tidak digunakan atau tidak dapat digunakan lagi akan jauh lebih efektif dan efisien.
Lalu, bagaimana mengatasi komputer lelet dengan tepat?
Kerja Keras Adalah Energi Kita, free download, free e-book, service software, marketing software sales, adsense, business, keyword, tips and tricks, tool, keygen, crack, serial number, tutorial, gratis, bisnis online, ptc, e-book, blogging, internet, web design, tutorial, coreldraw, photoshop
Bagaimana jika Anda merasa pusing, kemudian pergi ke dokter dan tiba-tiba tanpa diperiksa sang dokter mengatakan bahwa Anda harus menjalani kemoterapi?
Udah deh...kebanyakan analogi kapan eksyennya? Oke deh, kembali ke laptop!
Untuk memperoleh tidakan yang tepat dalam mengobati komputer lelet, kita harus memeriksanya dengan tujuan mengetahui apa penyebab menurunnya kinerja komputer. Beberapa penyebab umum menurunnya kinerja komputer.
Untuk poin 2 dan 3, tunggu pembahasannya...
Read more
Biasanya, solusi pertama yang terpikir adalah upgrade. Buat yang berkantong tebal, mungkin tanpa pikir panjang langsung mengambil langkah tersebut. Tapi buat yang berkantong tipis sepertiku... mungkin cuma bisa garuk-garuk kepala pusing harus gimana.
Sebenarnya, belum tentu langkah mengupgrade hardware komputer menjadi solusi yang paling tepat. Ibarat rak buku, jika terlihat sesak karena berantakan apakah membeli rak buku yang lebih besar atau menambah rak buku menjadi solusi yang paling tepat? Benar, membereskan dan merapikan buku-buku dalam rak tersebut, serta memilah dan membuang buku-buku yang sudah tidak digunakan atau tidak dapat digunakan lagi akan jauh lebih efektif dan efisien.
Lalu, bagaimana mengatasi komputer lelet dengan tepat?
Kerja Keras Adalah Energi Kita, free download, free e-book, service software, marketing software sales, adsense, business, keyword, tips and tricks, tool, keygen, crack, serial number, tutorial, gratis, bisnis online, ptc, e-book, blogging, internet, web design, tutorial, coreldraw, photoshop
Bagaimana jika Anda merasa pusing, kemudian pergi ke dokter dan tiba-tiba tanpa diperiksa sang dokter mengatakan bahwa Anda harus menjalani kemoterapi?
Udah deh...kebanyakan analogi kapan eksyennya? Oke deh, kembali ke laptop!
Untuk memperoleh tidakan yang tepat dalam mengobati komputer lelet, kita harus memeriksanya dengan tujuan mengetahui apa penyebab menurunnya kinerja komputer. Beberapa penyebab umum menurunnya kinerja komputer.
- Virus
- System Berantakan
- Setting yang Tidak Tepat
Beberapa hal yang sering dilakukan virus yang dapat memperlambat kinerja komputer adalah meletakkan file-file execution dan menjalankannya tanpa sepengetahuan kita. Proses yang dilakukan oleh file-file virus ini tentu saja memakan resources CPU dan memory. Banyak jenis virus yang membuat duplikat dari sebagian atau bahkan seluruh file kita, sehingga menyebabkan hardisk kita penuh sesak. Hal ini akan menghambat proses reading dan writing pada hardisk. Padahal, setiap kita mengeksekusi komputer kita, selalu terjadi proses reading data dari hardisk.
Jadi, langkah pertama yang harus kita lakukan adalh memeriksa apakah komputer kita terinfeksi virus atau tidak. Cara yang paling mudah tentunya dengan melakukan scanning komputer menggunakan antivirus. Install antivirus dan scan komputer Anda secara menyeluruh. Jangan lupa, pastikan antivirus Anda telah terupdate atau setidaknya memiliki data-data virus terbaru sehingga antivirus dapat megenalinya jika komputer Anda terjangkit virus baru.
Untuk poin 2 dan 3, tunggu pembahasannya...
Thursday, February 19, 2009
Adding and Deleting Keys and Values
Editing the Registry often requires that you add and delete keys and values To add a new key, select the new key's parent key in the left pane. Then, choose Edit New
Key from the menu. Type in the new key's name. You can also right-click on the new key's parent key and choose Edit
New
Key. To delete a key, select it and press the Delete key.
Very often, you need to add values to a key in order for its changes to take effect. To add a value to a key, select the new key's parent key in the left pane. From the menu, choose Edit New, and from the submenu, select the type of value you want to create. We've already covered the five types of values you can create; as a reminder, they're detailed in Table1.
To create a new value, type in the name of the new value and press Enter. Press Enter again. The Edit Value dialog box appears. Enter your data and press Enter.
| Value name | Registry data type |
|---|---|
Wednesday, February 18, 2009
Logical Registry Hive
The Registry has many thousands of settings; in fact, it often has tens of thousands of them. They are organized into five main Registry sections, called Registry hives. Think of each hive as a root directory. Each of the hives has a different purpose. When you start to delve into the Registry, you may notice that many of the settings seem to be exact duplicates of one another—in other words, settings in one hive mirror the settings in another hive. In fact, frequently one set of settings is merely an alias (called a symbolic link) of another, so that when you change those settings in one place, the changes are made in both hives.
The hives themselves are stored in the C:\Windows\system32\config and C:\Documents and Settings\{username} files.
Following are the five hives and what each does:
HKEY_CLASSES_ROOT
This hive contains information about file types, filename extensions, and similar information. It instructs XP how to handle every different file type and controls basic user interface options, such as double-clicking and context menus. This hive also includes class definitions (hence the word "CLASSES" in its name) of unique objects, such as file types or OLE objects. Frequently, classes associated with file types contain the Shell subkey, which defines actions, such as opening and printing, that can be taken with that file type.
HKEY_CURRENT_USER
This hive contains configuration information about the system setup of the user that is currently logged into XP. It controls the current user's Desktop, as well as XP's specific appearance and behavior for the current user. This hive also manages network connections and connections to devices such as printers, personal preferences such as screen colors, as well as security rights. Also included in this hive are Security Identifiers (SIDs), which uniquely identify users of the PC and which have information about each user's rights, settings, and preferences.
HKEY_LOCAL_MACHINE
This hive contains information about the computer itself, as well as about the operating system. It includes specific details about all hardware, including keyboard, printer ports, storage—the entire hardware setup. In addition, it has information about security, installed software, system startup, drivers, services, and the machine's specific XP configuration.
HKEY_USERS
This hive contains information about every user profile on the system.
HKEY_CURRENT_CONFIG
This hive contains information about the current hardware configuration of the system, in the same way that HKEY_CURRENT_USER contains information about the current user of the system.
Read more
The hives themselves are stored in the C:\Windows\system32\config and C:\Documents and Settings\{username} files.
Following are the five hives and what each does:
HKEY_CLASSES_ROOT
This hive contains information about file types, filename extensions, and similar information. It instructs XP how to handle every different file type and controls basic user interface options, such as double-clicking and context menus. This hive also includes class definitions (hence the word "CLASSES" in its name) of unique objects, such as file types or OLE objects. Frequently, classes associated with file types contain the Shell subkey, which defines actions, such as opening and printing, that can be taken with that file type.
HKEY_CURRENT_USER
This hive contains configuration information about the system setup of the user that is currently logged into XP. It controls the current user's Desktop, as well as XP's specific appearance and behavior for the current user. This hive also manages network connections and connections to devices such as printers, personal preferences such as screen colors, as well as security rights. Also included in this hive are Security Identifiers (SIDs), which uniquely identify users of the PC and which have information about each user's rights, settings, and preferences.
HKEY_LOCAL_MACHINE
This hive contains information about the computer itself, as well as about the operating system. It includes specific details about all hardware, including keyboard, printer ports, storage—the entire hardware setup. In addition, it has information about security, installed software, system startup, drivers, services, and the machine's specific XP configuration.
HKEY_USERS
This hive contains information about every user profile on the system.
HKEY_CURRENT_CONFIG
This hive contains information about the current hardware configuration of the system, in the same way that HKEY_CURRENT_USER contains information about the current user of the system.
Tuesday, February 17, 2009
Windows Registry is not Ghost
If you haven't spent much time in the Registry, you can easily be cowed by it. At first glance, it's a maze of apparently incomprehensible settings. In fact, though, there's a method to the madness. The Registry is a hierarchical database of information that defines exactly how your system works, including virtually every part of XP and its applications. Editing the Registry database is often the best way to hack XP. In fact, there are many changes to the operating system that you can make in no other way.
Even if you've never used the Registry directly before, you've changed it without realizing it. Whenever you change a setting using the Control Panel, for example, behind the scenes a Registry change is made that puts that new setting into effect. The menus and dialog boxes you see in XP are often little more than a visual front-end to the Registry.
If you want to optimize XP and master every part of it, you'll have to use the Registry. XP contains so many different settings and customizations that it simply wasn't possible for Microsoft to build a graphical interface for every conceivable possibility. And there are many times when it's easier and you get more options when you edit the Registry rather than using the graphical XP interface. You can use Windows XP without ever editing the Registry—many users do—but advanced users understand its power tool status.
The way to edit the Registry is by using the Registry Editor , also called RegEdit. To run it, type regedit at the Run box or command line and press Enter.
Before you edit the Registry, though, you should first get a basic understanding of its structure.
Read more
Even if you've never used the Registry directly before, you've changed it without realizing it. Whenever you change a setting using the Control Panel, for example, behind the scenes a Registry change is made that puts that new setting into effect. The menus and dialog boxes you see in XP are often little more than a visual front-end to the Registry.
If you want to optimize XP and master every part of it, you'll have to use the Registry. XP contains so many different settings and customizations that it simply wasn't possible for Microsoft to build a graphical interface for every conceivable possibility. And there are many times when it's easier and you get more options when you edit the Registry rather than using the graphical XP interface. You can use Windows XP without ever editing the Registry—many users do—but advanced users understand its power tool status.
The way to edit the Registry is by using the Registry Editor , also called RegEdit. To run it, type regedit at the Run box or command line and press Enter.
Before you edit the Registry, though, you should first get a basic understanding of its structure.
Sunday, January 18, 2009
Mengubah ikon default shortcut utama pada desktop
Selain mengubah nama shortcut utama pada desktop, melalui registry editor Anda juga dapat mengubah ikon default shortcut-shortcut utama tersebut disesuaikan dengan selera Anda. Syaratnya, Anda harus memiliki file ikon yang akan Anda gunakan.
Ikuti langkah-langkah berikut.
- Buka Registry Editor dengan mengklik Start > Run dan menuliskan regedit pada field Open yang tersedia, kemudian klik OK.
- Pada jendela Registry Editor, cari key HKEY_CURRENT_USER | Software | Microsoft | Windows | CurrentVersion | Explorer | CLSID".
Di dalam key tersebut biasanya terdapat lima subkey yang merupakan ID dari shortcut-shortcut penting di atas, yaitu:
My Network Places:
{208D2C60-3AEA-1069-A2D7-08002B30309D}
My Computer:
{20D04FE0-3AEA-1069-A2D8-08002B30309D}
My Documents:
{450D8FBA-AD25-11D0-98A8-0800361B1103}
Recycle Bin:
{645FF040-5081-101B-9F08-00AA002F954E}
Default IE Icon:
{871C5380-42A0-1069-A2EA-08002B30309D}
- Klik ganda salah satu subkey tersebut, misalnya {450D8FBA-AD25-11D0-98A8-0800361B1103} yaitu ID untuk shortcut My Documents, sehingga muncul subkey DefaultIcon.
- Klik subkey DefaultIcon. Pada jendela sebelah kanan akan terlihat string Default yang berisi lokasi ikon shortcut My Documents.
- Klik ganda string Default tersebut.
- Pada jendela Edit String tuliskan path file ikon yang akan Anda gunakan, misalnya C:/ikonku/MyDoc.ico pada field Value Data.
- Klik OK untuk menyetujuinya.
- Ulangi langkah 3-7 untuk mengganti ikon default dari shortcut-shortcut utama yang lainnya.
- Keluar dari program Registry Editor, kemudian Logoff PC Anda dan Logon lagi untuk melihat hasilnya.
Kini desktop Anda akan memiliki shortcut utama dengan ikon yang unik, lucu, atau GBGL (gue banget gitu loh).
Tambahan:
- Jika ternyata dalam key HKEY_CURRENT_USER | Software | Microsoft | Windows | CurrentVersion | Explorer | CLSID Anda terdapat subkey kurang dari lima, Anda dapat membuat sendiri subkey yang belum tersedia.
Caranya adalah dengan mengklik kanan CLSID dan pilih New > Key atau dengan mengklik (kiri) CLSID dan kemudian memilih menu Edit > New > Key.
Tulis ID dari subkey yang belum tersedia. Misalnya subkey {450D8FBA-AD25-11D0-98A8-0800361B1103} belum ada maka tulislah {450D8FBA-AD25-11D0-98A8-0800361B1103} sebagai nama subkey baru tersebut.
- Untuk key yang baru Anda buat, tidak akan memuat subkey DefaultIcon sehingga Anda harus membuatnya sendiri dengan cara mengklik kanan key yang belum memiliki subkey DefaultIcon kemudian pilih New > Key. Beri nama DefaultIcon pada subkey baru tersebut.
Pada jendela kanan akan terlihat satu string (Default) namun dengan tipe REG_SZ. Buat string baru dengan memilih menu Edit > New > Expandable String Value. Beri nama (Default). Kini, Anda memiliki dua string dengan nama (Default) namun berbeda type.
Klik ganda pada string (Default) dengan type REG_EXPAND_SZ, kemudian tuliskan path tempat ikon baru Anda yang akan digunakan (seperti langkah 6). Klik OK untuk menyetujuinya.
Selamat mencoba!
Ikuti langkah-langkah berikut.
- Buka Registry Editor dengan mengklik Start > Run dan menuliskan regedit pada field Open yang tersedia, kemudian klik OK.
- Pada jendela Registry Editor, cari key HKEY_CURRENT_USER | Software | Microsoft | Windows | CurrentVersion | Explorer | CLSID".
Di dalam key tersebut biasanya terdapat lima subkey yang merupakan ID dari shortcut-shortcut penting di atas, yaitu:
My Network Places:
{208D2C60-3AEA-1069-A2D7-08002B30309D}
My Computer:
{20D04FE0-3AEA-1069-A2D8-08002B30309D}
My Documents:
{450D8FBA-AD25-11D0-98A8-0800361B1103}
Recycle Bin:
{645FF040-5081-101B-9F08-00AA002F954E}
Default IE Icon:
{871C5380-42A0-1069-A2EA-08002B30309D}
- Klik ganda salah satu subkey tersebut, misalnya {450D8FBA-AD25-11D0-98A8-0800361B1103} yaitu ID untuk shortcut My Documents, sehingga muncul subkey DefaultIcon.
- Klik subkey DefaultIcon. Pada jendela sebelah kanan akan terlihat string Default yang berisi lokasi ikon shortcut My Documents.
- Klik ganda string Default tersebut.
- Pada jendela Edit String tuliskan path file ikon yang akan Anda gunakan, misalnya C:/ikonku/MyDoc.ico pada field Value Data.
- Klik OK untuk menyetujuinya.
- Ulangi langkah 3-7 untuk mengganti ikon default dari shortcut-shortcut utama yang lainnya.
- Keluar dari program Registry Editor, kemudian Logoff PC Anda dan Logon lagi untuk melihat hasilnya.
Kini desktop Anda akan memiliki shortcut utama dengan ikon yang unik, lucu, atau GBGL (gue banget gitu loh).
Tambahan:
- Jika ternyata dalam key HKEY_CURRENT_USER | Software | Microsoft | Windows | CurrentVersion | Explorer | CLSID Anda terdapat subkey kurang dari lima, Anda dapat membuat sendiri subkey yang belum tersedia.
Caranya adalah dengan mengklik kanan CLSID dan pilih New > Key atau dengan mengklik (kiri) CLSID dan kemudian memilih menu Edit > New > Key.
Tulis ID dari subkey yang belum tersedia. Misalnya subkey {450D8FBA-AD25-11D0-98A8-0800361B1103} belum ada maka tulislah {450D8FBA-AD25-11D0-98A8-0800361B1103} sebagai nama subkey baru tersebut.
- Untuk key yang baru Anda buat, tidak akan memuat subkey DefaultIcon sehingga Anda harus membuatnya sendiri dengan cara mengklik kanan key yang belum memiliki subkey DefaultIcon kemudian pilih New > Key. Beri nama DefaultIcon pada subkey baru tersebut.
Pada jendela kanan akan terlihat satu string (Default) namun dengan tipe REG_SZ. Buat string baru dengan memilih menu Edit > New > Expandable String Value. Beri nama (Default). Kini, Anda memiliki dua string dengan nama (Default) namun berbeda type.
Klik ganda pada string (Default) dengan type REG_EXPAND_SZ, kemudian tuliskan path tempat ikon baru Anda yang akan digunakan (seperti langkah 6). Klik OK untuk menyetujuinya.
Selamat mencoba!
Thursday, January 15, 2009
Mengubah nama default shortcut utama pada desktop
Pada Windows XP terdapat shortcut-shortcut utama yang muncul pada desktop, yaitu My Computer, Recycle Bin, My Network Places, My Documents,dan Internet Explorer. Shortcut-shortcut tidak bisa diubah namanya melalui fungsi "Rename", baik melalui Windows Explorer maupun menu konteks. Sistem tidak memperkenankan pengubahan nama shortcut-shortcut tersebut semudah itu. Jadi, pengguna awam yang menggunakan
Windows XP akan selalu dihadapkan dengan penamaan yang itu-itu saja. Padahal, banyak pengguna Windows yang ingin desktopnya tampil beda, salah satunya adalah dengan mengubah nama dari shortcut-shortcut penting tersebut.
Meski tidak dapat diubah dengan cara biasa, Anda masih dapat mengubahnya dengan cara luar biasa, yaitu mengedit registry.
Ikuti langkah-langkah berikut.
- Buka Registry Editor dengan mengklik Start > Run dan menuliskan regedit pada field Open yang tersedia, kemudian klik OK.
- Pada jendela Registry Editor, cari key
HKEY_CURRENT_USER | Software | Microsoft | Windows | CurrentVersion | Explorer | CLSID".
Di dalam key tersebut biasanya terdapat lima subkey yang merupakan ID dari shortcut-shortcut penting di atas, yaitu:
My Network Places:
{208D2C60-3AEA-1069-A2D7-08002B30309D}
My Computer:
{20D04FE0-3AEA-1069-A2D8-08002B30309D}
My Documents:
{450D8FBA-AD25-11D0-98A8-0800361B1103}
Recycle Bin:
{645FF040-5081-101B-9F08-00AA002F954E}
Default IE Icon:
{871C5380-42A0-1069-A2EA-08002B30309D}
- Klik salah satu subkey tersebut, misalnya
{20D04FE0-3AEA-1069-A2D8-08002B30309D}
- Pada jendela sebelah kanan terdapat entri Default. Klik ganda entri Default tersebut.
- Pada jendela Edit String tuliskan nama baru pada field Value Data untuk mengganti nama MyComputer.
- Klik OK untuk menyetujuinya.
- Lakukan langkah-langkah 3-6 untuk subkey-subkey yang lain.
- Logoff PC Anda dan Logon lagi untuk melihat hasilnya.
Kini desktop Anda akan memiliki shortcut utama dengan nama unik, lucu, atau GBGL (gue banget gitu loh).
Tambahan:
Jika ternyata dalam key
HKEY_CURRENT_USER | Software | Microsoft | Windows | CurrentVersion | Explorer | CLSID Anda terdapat subkey kurang dari lima, Anda dapat membuat sendiri subkey yang belum tersedia.
Caranya adalah dengan mengklik kanan CLSID dan pilih New > Key atau dengan mengklik (kiri) CLSID dan kemudian memilih menu Edit > New > Key.
Tulis ID dari subkey yang belum tersedia. Misalnya, subkey {450D8FBA-AD25-11D0-98A8-0800361B1103} belum ada maka tulislah {450D8FBA-AD25-11D0-98A8-0800361B1103} sebagai nama subkey baru tersebut.
Baru kemudian ubah nama My Documents dengan nama yang sesuai selera Anda.
Selain mengubah nama shortcut, Anda juga dapat mengubah ikon dari shortcut-shortcut utama tersebut. Caranya, tunggu artikel berikutnya!
Selamat mencoba!
Menjadwal Login pada Windows XP
Anda memiliki PC yang digunakan bersama-sama dengan anggota keluarga?
Wah, namanya bukan personal computer (PC) lagi donk?! Mungkin lebih tepat disebut KOMMA (KOMputer bersaMA).
Terkadang, komputer bersama ini menimbulkan masalah karena para user berebut menggunakannya. Oleh karena itu, jika
Anda bertindak sebagai Administrator
KOMMA tersebut, Anda dapat mengatur jadwal
penggunaan untuk setiap user.
Caranya sangat mudah, ikuti langkah-langkahnya berikut.
1. Klik Start > Run
2. Ketikkan CMD untuk membuka Command Prompt
3. Pada jendela Command Prompt, ketikkan jadwal login tiap user dengan rumus:
Net User [username] /Time:[hari1]-[hari2],[jam1]-[jam2]
Misalnya, komputer Anda digunakan untuk tiga orang, Anda dan adik-adik Anda (Devan dan Devin) maka tulislah
net user devan /time:M-F,7pm-9pm
net user devin /time:M-F,4pm-6pm
Dengan perintah di atas maka Devan hanya dapat mengakses user account-nya pada hari Senin sampai hari Jumat jam 4 sore sampai jam 6 sore.
Jika Devan mencoba mengaksesnya di luar jadwal tersebut maka akan muncul permintaan password.
Adapun Devin memiliki jadwal untuk menggunakan komputer pada hari Senin sampai dengan hari Jumat jam 7 malam hingga jam 9 malam.
Mudah-mudahan trik ini dapat mencegah terjadinya kasus rebutan komputer bersama di rumah Anda.
Read more
Wah, namanya bukan personal computer (PC) lagi donk?! Mungkin lebih tepat disebut KOMMA (KOMputer bersaMA).
Terkadang, komputer bersama ini menimbulkan masalah karena para user berebut menggunakannya. Oleh karena itu, jika
Anda bertindak sebagai Administrator
KOMMA tersebut, Anda dapat mengatur jadwal
penggunaan untuk setiap user.
Caranya sangat mudah, ikuti langkah-langkahnya berikut.
1. Klik Start > Run
2. Ketikkan CMD untuk membuka Command Prompt
3. Pada jendela Command Prompt, ketikkan jadwal login tiap user dengan rumus:
Net User [username] /Time:[hari1]-[hari2],[jam1]-[jam2]
Misalnya, komputer Anda digunakan untuk tiga orang, Anda dan adik-adik Anda (Devan dan Devin) maka tulislah
net user devan /time:M-F,7pm-9pm
net user devin /time:M-F,4pm-6pm
Dengan perintah di atas maka Devan hanya dapat mengakses user account-nya pada hari Senin sampai hari Jumat jam 4 sore sampai jam 6 sore.
Jika Devan mencoba mengaksesnya di luar jadwal tersebut maka akan muncul permintaan password.
Adapun Devin memiliki jadwal untuk menggunakan komputer pada hari Senin sampai dengan hari Jumat jam 7 malam hingga jam 9 malam.
Mudah-mudahan trik ini dapat mencegah terjadinya kasus rebutan komputer bersama di rumah Anda.
Wednesday, November 12, 2008
Personal Logon Wallpaper
In default setting, Windows XP will appearing loading screen, logon screen,
and welcome screen every logon.
This tutorial will show you the trick to change logon screen with your design.
This is the trick.
1. Make a 800px × 600px wallpaper (resolution 72 ppi) with your image editing
software (Adobe Photoshop, Corel Photopaint, Macromedia Firework, GIMP, etc).
2. Save your wallpaper with bitmap extension (yourwallpaper.bmp).
3. Open the Registry Editor by click Startmenu > Run ... and then type regedit
on the window that appear later.

4. Find the key HKEY_USERS\.DEFAULT\Control Panel\Desktop.

5. Double click Wallpaper key and type the path of yourwallpaper location on the
Value data. In this totorial, I fill it with G:\BLOG\posting\bogirotheme.bmp.

6. Restart your Windows to see the result.
Read more
and welcome screen every logon.
This tutorial will show you the trick to change logon screen with your design.
This is the trick.
1. Make a 800px × 600px wallpaper (resolution 72 ppi) with your image editing
software (Adobe Photoshop, Corel Photopaint, Macromedia Firework, GIMP, etc).
2. Save your wallpaper with bitmap extension (yourwallpaper.bmp).
3. Open the Registry Editor by click Startmenu > Run ... and then type regedit
on the window that appear later.

4. Find the key HKEY_USERS\.DEFAULT\Control Panel\Desktop.

5. Double click Wallpaper key and type the path of yourwallpaper location on the
Value data. In this totorial, I fill it with G:\BLOG\posting\bogirotheme.bmp.

6. Restart your Windows to see the result.
Tuesday, October 28, 2008
Change Windows XP Logon Screen
In default setting, Windows XP will appearing loading screen, logon screen,
and welcome screen every logon.
This tutorial will show you the trick to change logon screen with your design.
This is the trick.
1. Make a 800px × 600px wallpaper (resolution 72 ppi) with your image editing
software (Adobe Photoshop, Corel Photopaint, Macromedia Firework, GIMP, etc).
2. Save your wallpaper with bitmap extension (yourwallpaper.bmp).
3. Open the Registry Editor by click Startmenu > Run ... and then type regedit
on the window that appear later.
4. Find the key HKEY_USERS\.DEFAULT\Control Panel\Desktop.
5. Double click Wallpaper key and type the path of yourwallpaper location on the
Value data. In this totorial, I fill it with G:\BLOG\posting\bogirotheme.bmp.
6. Restart your Windows to see the result.
Read more
and welcome screen every logon.
This tutorial will show you the trick to change logon screen with your design.
This is the trick.
1. Make a 800px × 600px wallpaper (resolution 72 ppi) with your image editing
software (Adobe Photoshop, Corel Photopaint, Macromedia Firework, GIMP, etc).
2. Save your wallpaper with bitmap extension (yourwallpaper.bmp).
3. Open the Registry Editor by click Startmenu > Run ... and then type regedit
on the window that appear later.
4. Find the key HKEY_USERS\.DEFAULT\Control Panel\Desktop.
5. Double click Wallpaper key and type the path of yourwallpaper location on the
Value data. In this totorial, I fill it with G:\BLOG\posting\bogirotheme.bmp.
6. Restart your Windows to see the result.
Playing DVD with WMP
Generally, everyone who want to play their DVD, they would be installing a
DVD player software. Finally, they waste much space of harddisk for some multimedia
software.
Actually, we can play DVD with Windows Media Player that automatically
installed conterminous with Windows operating system. With a little modify in the
registry, Windows Media Player that normally can play mpeg I and mpeg II only,
become a DVD player.
This is the method.
1. Open the Registry Editor by click Startmenu > Run ... and then type regedit
on the window that appear later.
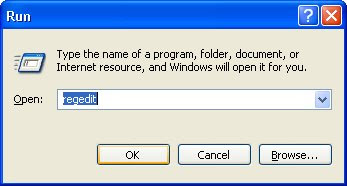
2. Find HKEY_CURRENT_USER/Software/Microsoft/MediaPlayer/Player/
Settings.
3. Make a new string by select menu Edit > New > String Value and give name
DVDUI.
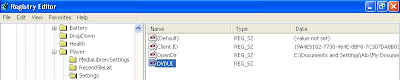
4. Double click on it and type Yes on the Value Data.
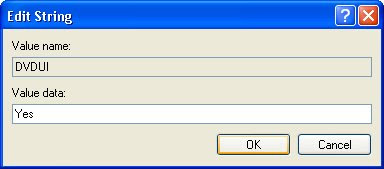
5. Restart your Windows for see the result.
Read more
DVD player software. Finally, they waste much space of harddisk for some multimedia
software.
Actually, we can play DVD with Windows Media Player that automatically
installed conterminous with Windows operating system. With a little modify in the
registry, Windows Media Player that normally can play mpeg I and mpeg II only,
become a DVD player.
This is the method.
1. Open the Registry Editor by click Startmenu > Run ... and then type regedit
on the window that appear later.

2. Find HKEY_CURRENT_USER/Software/Microsoft/MediaPlayer/Player/
Settings.
3. Make a new string by select menu Edit > New > String Value and give name
DVDUI.

4. Double click on it and type Yes on the Value Data.

5. Restart your Windows for see the result.
Mencegah Perubahan Menu Start
Untuk komputer yang digunakan oleh multiuser, seringkali setiap user mengubah
setting dan tampilan Windows sesuai kebutuhan dan selera masing-masing,
termasuk pada Startmenu.
Jika Anda seorang administrator, Anda dapat mencegah user lain untuk mengubah
Startmenu dengan mengedit registry Windows Anda. Caranya adalah sebagai
berikut.
(Jangan lupa untuk membuat backup registry agar jika terjadi kesalahan Anda
dapat me-restore kembali registry Anda)
1. Buka registry editor dengan mengetik regedit pada Startmenu > Run...


2. Buka HKEY_CURRENT_USER/Software/Microsoft/Windows/
CurrentVersion/Policies/Explorer.
3. Buat sebuah DWORD Value baru melalui dan beri nama NoChangeStartMenu.

4. Klik ganda NoChangeStartMenu dan masukkan angka 1 pada Value Data.
5. Restart Windows Anda untuk melihat hasilnya.
Read more
setting dan tampilan Windows sesuai kebutuhan dan selera masing-masing,
termasuk pada Startmenu.
Jika Anda seorang administrator, Anda dapat mencegah user lain untuk mengubah
Startmenu dengan mengedit registry Windows Anda. Caranya adalah sebagai
berikut.
(Jangan lupa untuk membuat backup registry agar jika terjadi kesalahan Anda
dapat me-restore kembali registry Anda)
1. Buka registry editor dengan mengetik regedit pada Startmenu > Run...

2. Buka HKEY_CURRENT_USER/Software/Microsoft/Windows/
CurrentVersion/Policies/Explorer.
3. Buat sebuah DWORD Value baru melalui dan beri nama NoChangeStartMenu.

4. Klik ganda NoChangeStartMenu dan masukkan angka 1 pada Value Data.
5. Restart Windows Anda untuk melihat hasilnya.
Saturday, August 23, 2008
Change IE Title
We can change our Internet Explorer title with any name what we want by little registry modification. Here is the trick:
Remember to backup your Registry before you modify it.
1. Click Start > Run.
2. In the Run window that appear, type: regedit and than click OK.
3. Select HKEY_CURRENT_USER/Software/Microsoft/Internet Explorer/Main
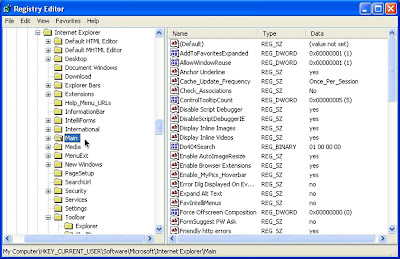
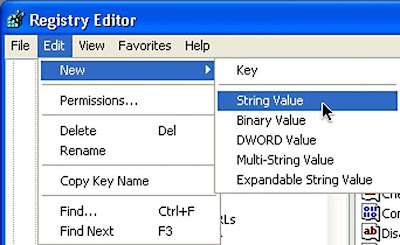
4. Make a new string by select Edit > New > String Value and give it name Window Title.
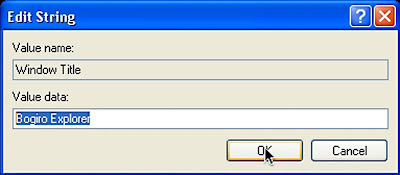
5. Double click on Window Title String and fill with any word that you want in the Value Data column (ex: Bogiro Explorer). Click OK.
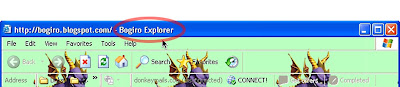
6. Open your IE to see the change effect.
Read more
Remember to backup your Registry before you modify it.
1. Click Start > Run.
2. In the Run window that appear, type: regedit and than click OK.
3. Select HKEY_CURRENT_USER/Software/Microsoft/Internet Explorer/Main

4. Make a new string by select Edit > New > String Value and give it name Window Title.

5. Double click on Window Title String and fill with any word that you want in the Value Data column (ex: Bogiro Explorer). Click OK.

6. Open your IE to see the change effect.

Friday, August 15, 2008
Change IE Toolbar Background
Weary with your Internet Explorer appearance? You can change it with a little registry tweaking. This is the method:
(Remember to backup the registry always before you tweak it!)
1. Open your Registry Editor by Click Start > Run and type regedit in Run window, than click OK.
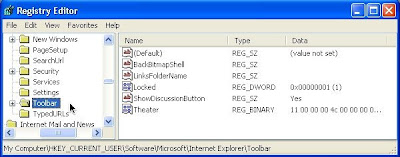
2. Select HKEY_CURRENT_USER/Software/Microsoft/Internet Explorer/Toolbar
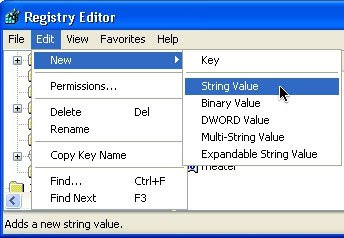
3. Click Edit > New > String Value and naming it BackBitmap.
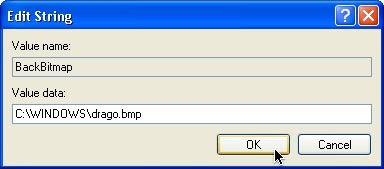
4. Doubleclick BackBitmap string to appear Edit String window and fill the Value Data with the path of bitmap image that you will use it for IE background. Click OK.
5. Open your Internet Explorer by click Start > All Programs > Internet Explorer or double click on it shortcut anywhere yo placing it.
6. Your Internet Explorer will appear with fresh toolbar background.

Read more
(Remember to backup the registry always before you tweak it!)
1. Open your Registry Editor by Click Start > Run and type regedit in Run window, than click OK.

2. Select HKEY_CURRENT_USER/Software/Microsoft/Internet Explorer/Toolbar
3. Click Edit > New > String Value and naming it BackBitmap.

4. Doubleclick BackBitmap string to appear Edit String window and fill the Value Data with the path of bitmap image that you will use it for IE background. Click OK.

5. Open your Internet Explorer by click Start > All Programs > Internet Explorer or double click on it shortcut anywhere yo placing it.
6. Your Internet Explorer will appear with fresh toolbar background.

Monday, July 28, 2008
Kill Your PC Faster (Don’t Excruciated It)
Sometimes, you work with your PC and you get suddenly call to do sameting immedietly. You want to shutdown your PC hurry but some program services need more times to stop their process. Unresignedly, you pull the power.
Stop. It will crashing your Windows. Using this tip to kill your PC faster.
Remember to backup the registry always before you tweak it!
1. Click Start > Run.
2. In the Run window that appear, type: regedit and than click OK.
3. Open subkey HKEY_LOCAL_MACHINE > SYSTEM > CurrentControlSet > Control
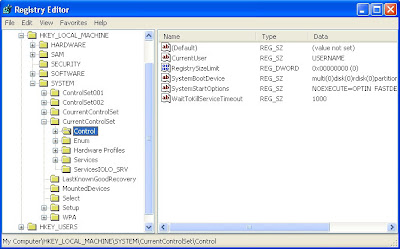
4. Double click on WaitToKillServiceTimeout.
5. Change the value with 1000.
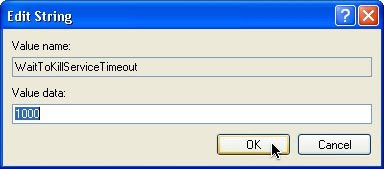
It’s mean when the service doesn’t stop they process on 1000 milliseconds (1 second), they would be forced end automatically.
Shutdown your PC to see the different. Your PC will die fast without dying.
Download e-book Windows Registry (1) here.
Read more
Stop. It will crashing your Windows. Using this tip to kill your PC faster.
Remember to backup the registry always before you tweak it!
1. Click Start > Run.
2. In the Run window that appear, type: regedit and than click OK.
3. Open subkey HKEY_LOCAL_MACHINE > SYSTEM > CurrentControlSet > Control

4. Double click on WaitToKillServiceTimeout.
5. Change the value with 1000.

It’s mean when the service doesn’t stop they process on 1000 milliseconds (1 second), they would be forced end automatically.
Shutdown your PC to see the different. Your PC will die fast without dying.
Download e-book Windows Registry (1) here.
Tuesday, July 22, 2008
Memory Tweaking for Windows XP
You have PC with 256 MB or higher memory but your Windows XP performance is not satisfyied? You can do this tip to tweak your PC memory.
Remember to back up your registry before you modificating it.
1. Click Start > Run.
2. In the Run window that appear, type: regedit and than click OK.
3. Open subkey HKEY_LOCAL_MACHINE > SYSTEM > CurrentControlSet > Control > Session Manager > Memory Management.
 4. Double Click on DisablePagingExecutive DWORD and fill 1 for Value Data. Click OK.
 It’s mean that Windows wouldn’t processing the paging file on harddisk, so your operating system and all programs will be more responsive. 5. Double Click on LargeSystemCache DWORD and fill 1 for Value Data. Click OK.
 It’s mean that you allowed the system to alocate all memory for file caching except 4 MB for disk caching. Windows XP kernel will processed on the memory so your Windows XP will processes faster.
Download e-book Windows Registry (1) here.
Read more
Remember to back up your registry before you modificating it.
1. Click Start > Run.
2. In the Run window that appear, type: regedit and than click OK.
3. Open subkey HKEY_LOCAL_MACHINE > SYSTEM > CurrentControlSet > Control > Session Manager > Memory Management.
 4. Double Click on DisablePagingExecutive DWORD and fill 1 for Value Data. Click OK.
 It’s mean that Windows wouldn’t processing the paging file on harddisk, so your operating system and all programs will be more responsive. 5. Double Click on LargeSystemCache DWORD and fill 1 for Value Data. Click OK.
 It’s mean that you allowed the system to alocate all memory for file caching except 4 MB for disk caching. Windows XP kernel will processed on the memory so your Windows XP will processes faster.
Download e-book Windows Registry (1) here.
Subscribe to:
Posts (Atom)